Starting with CDK part 2: Deploying a Lambda Application

Welcome to Part 2 of “Starting with CDK” . In Part 1 I helped you prepare your environments for CDK, as well as deploy and examine your first CDK application.
That first CDK app wasn’t too interesting though - it was just an empty shell with some metadata - so in this part you’ll start deploying actual resources.
This tutorial is based on the second of my “quick start” templates in GitHub, and so you’ll be able to find all the source code here. The quick start is named “Coffee Store V2”, since it’s actually an evolution of an example project I’ve been sharing since 2020. But all that matters for this tutorial is that it’s an example of a CDK application that deploys a resource, and specifically a Lambda function.

CDK code for a Lambda application
Before we start…
I’m thinking about writing a lot more about CDK. If you’re interested in this area please sign up below. You’ll be doing me a favor since I’ll get an idea of how many people are keen to hear about CDK, and in return I’ll let you know about new articles and open source updates as soon as they’re available. Thanks.
Preparations
The terminal examples in this article assume you are using a bash / zsh shell, or equivalent, with the leading
$signifying the terminal prompt. If you are using Windows you will need to adjust these commands if using a different type of terminal.
Download the template project
This tutorial uses a different template project from Part 1, so this time you’ll copy or clone, into a new directory, this template project from GitHub. E.g. run the following:
$ git clone git@github.com:symphoniacloud/coffee-store-v2.git
Prepare local and cloud environments
If you haven’t already done so then follow the Prepare your local environment and Prepare your AWS account for CDK sections from Part 1. Note that you can perform all the steps in the project you just downloaded - you don’t need to also download the “bare-bones” template referred to in Part 1.
The “Coffee Store V2” application
Deploying the application is just the same step you performed in Part 1:
$ npm install && npm run deploy
Once you’ve run
npm installonce in the project directory you won’t need to again
If successful, the end result will look something like this:
 ✅  CoffeeStore (coffee-store-v2)

✨  Deployment time: 64.38s

Outputs:
CoffeeStore.ApiUrl = https://t7bz3kq6zhpqiotdgp3tpvv7ie0vkpcw.lambda-url.us-east-1.on.aws/
Stack ARN:
arn:aws:cloudformation:us-east-1:397589511426:stack/coffee-store-v2/7ef9afc0-1a72-11ed-91e9-0e87df064301

✨  Total time: 68.29s
That CoffeeStore.ApiUrl value is a public URL. If you access your version with a web browser you should see a “Hello World” message.
What just happened?
First take a look at the source code for the CDK app. The “interesting stuff” is in app.ts, most of which is as follows:
class CoffeeStoreStack extends Stack {
    constructor(scope: Construct, id: string, props?: StackProps) {
        super(scope, id, props);

        const lambdaFunction = new NodejsFunction(this, 'HelloWorldFunction', {
            runtime: Runtime.NODEJS_16_X,
            entry: '../lambdaFunctions/api/lambda.ts',
            bundling: {
                target: 'node16',
                sourceMap: true,
                sourceMapMode: SourceMapMode.INLINE,
                sourcesContent: false
            },
        })

        const fnUrl = lambdaFunction.addFunctionUrl({
            authType: FunctionUrlAuthType.NONE
        })

        new CfnOutput(this, 'ApiUrl', {
            value: fnUrl.url
        })
    }
}
The first thing to note is that all of our resources are defined within a Stack. Usefully, this corresponds to the CloudFormation stack which will be deployed.
Within the Stack constructor function we are using one CDK construct - NodejsFunction - because we want to deploy a Lambda function that is using Node as its runtime (specifically Node 16, as defined by the runtime property) . Ignore for a moment the other properties in lambdaFunction.
We also attach a function URL to the Lambda function - this means that we can call it directly via https.
Logically our design looks like this:
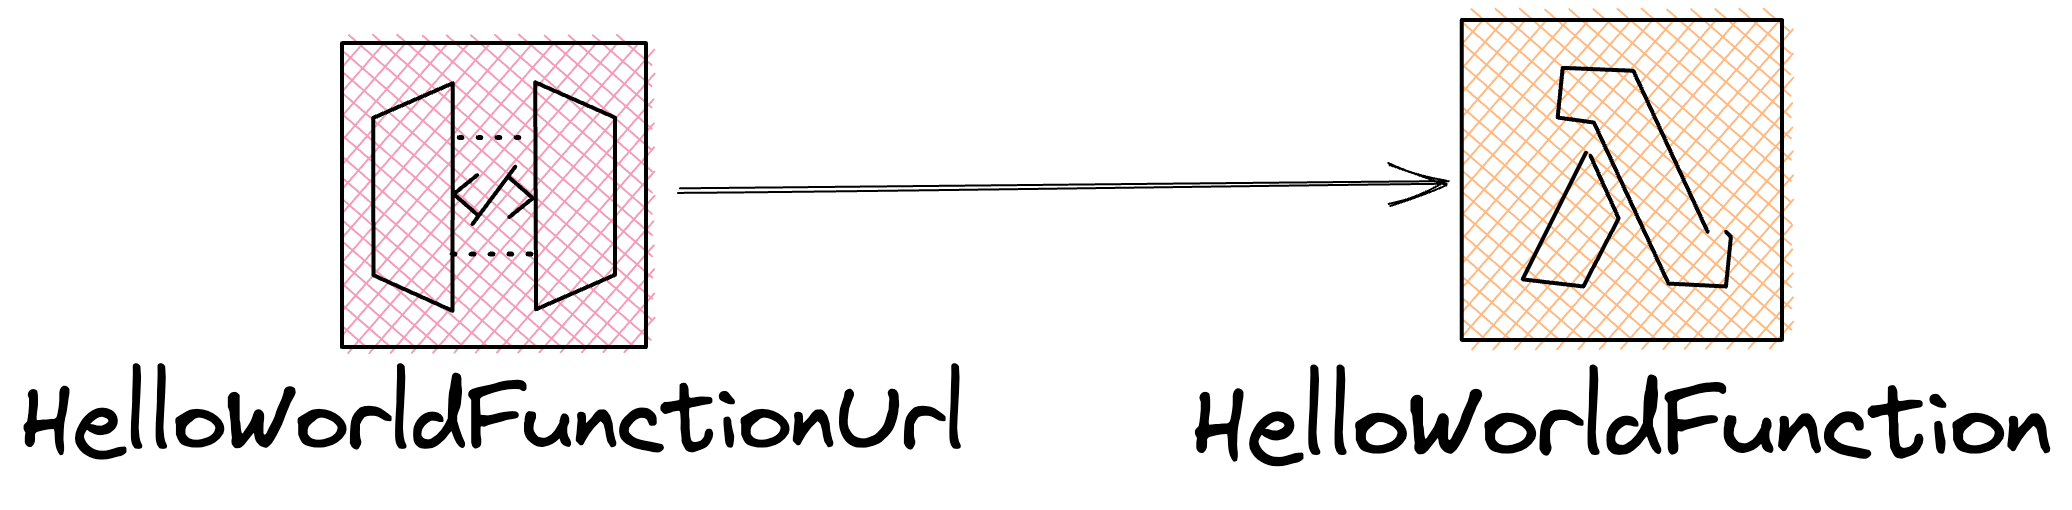
Logical design
When we deploy, CDK turns this file into a CloudFormation template, and deploys the template through the CloudFormation service, just like it did in Part 1, but now we have some real resources. Visit the CloudFormation console again, and this time look at the coffee-store-v2 stack, click on Resources, and then make sure you’re using Flat view. You’ll see that as well as the CDK Metadata there are four new resources:
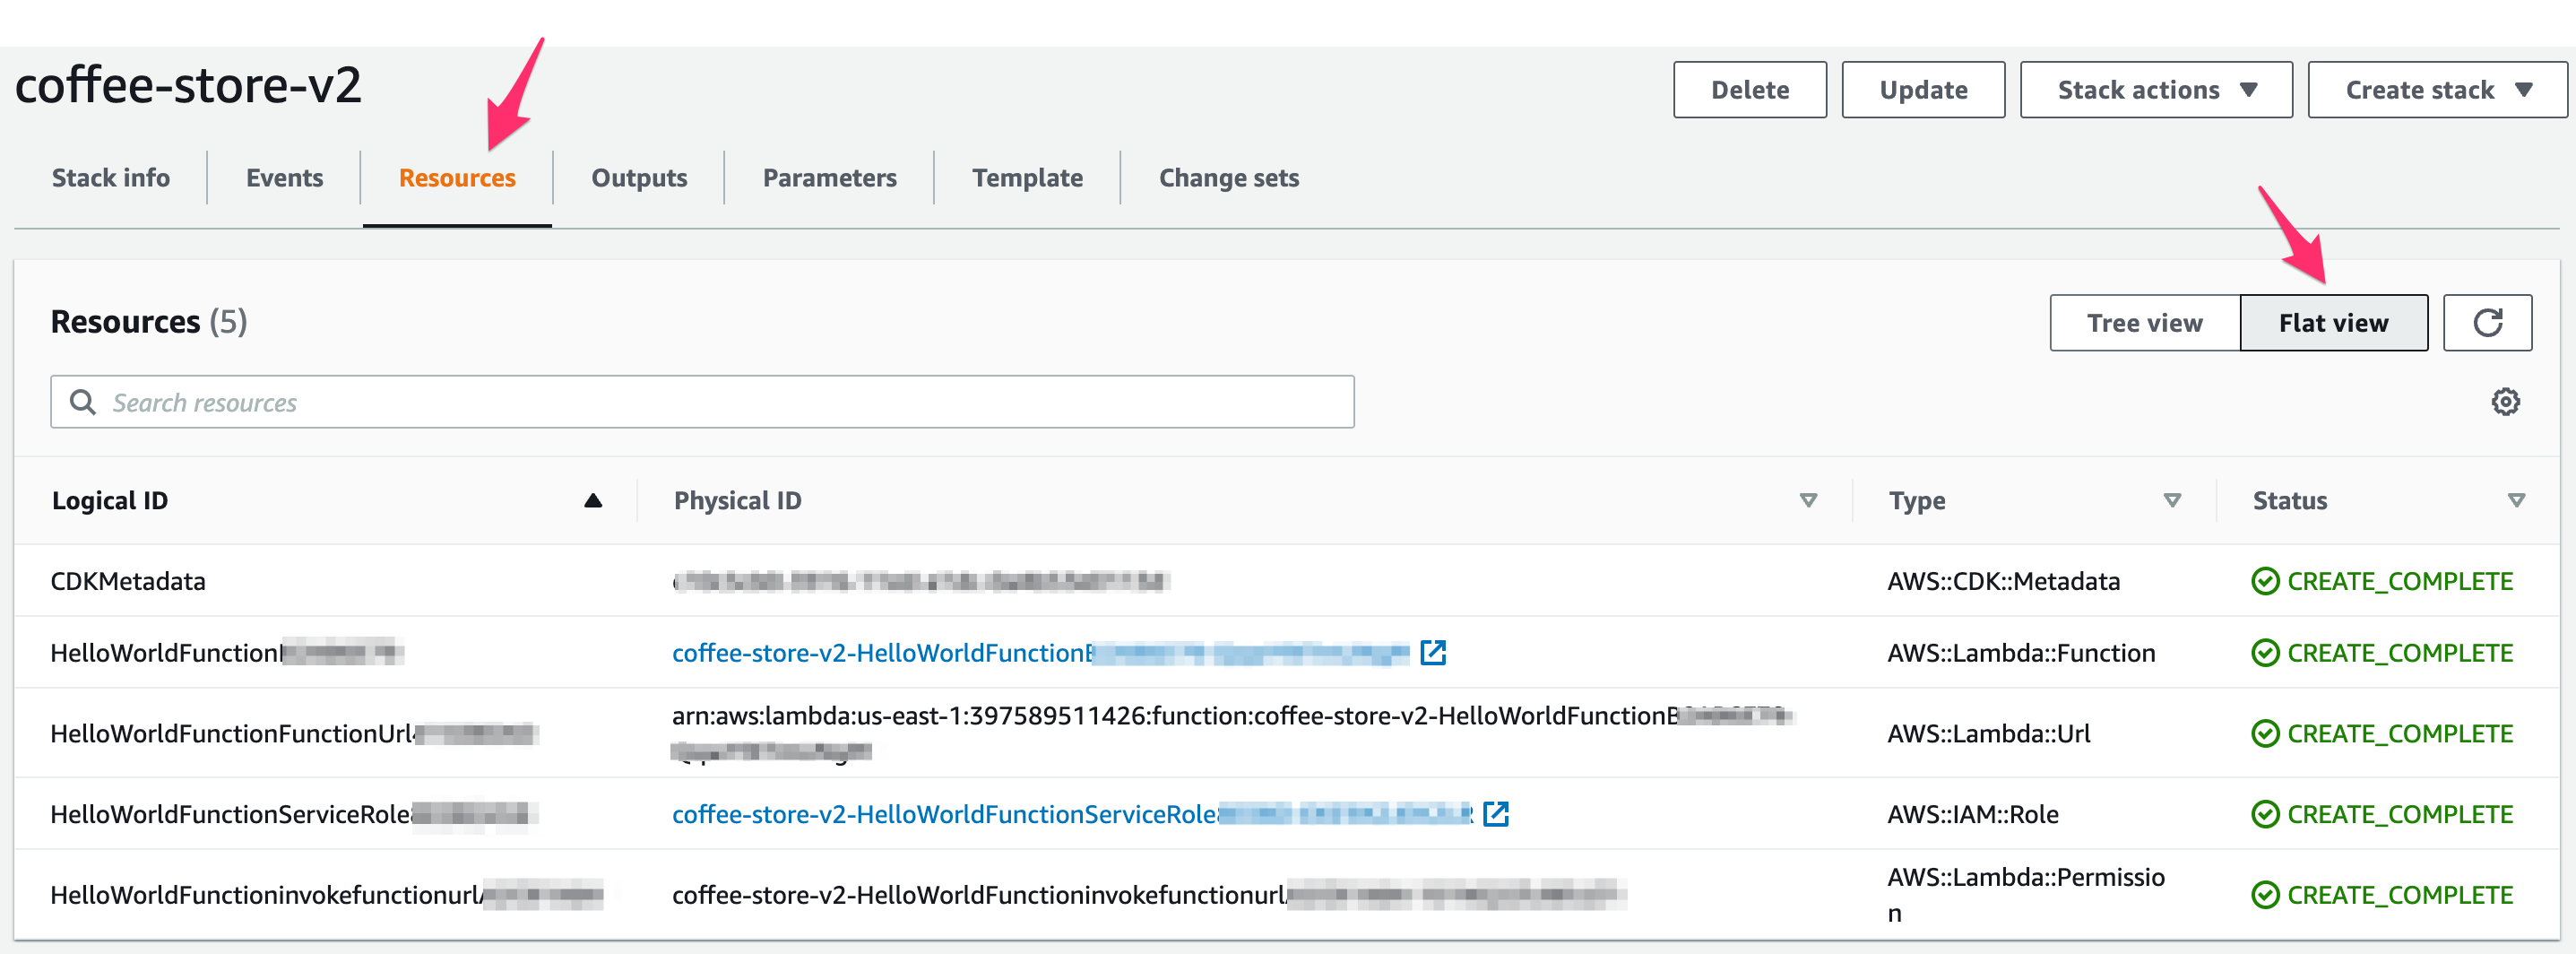
CloudFormation Output
Wait, four? But we only defined two resources in our CDK app - the Lambda function, and the function URL. What happened?!
The reason is that the particular CDK construct we used isn’t a 1-to-1 mapping with a CloudFormation resource - it’s a higher level pattern that CDK transforms into the underlying Lambda Function, Function URL, and various support resources - in this case an IAM Role and a “Lambda permission” resource.
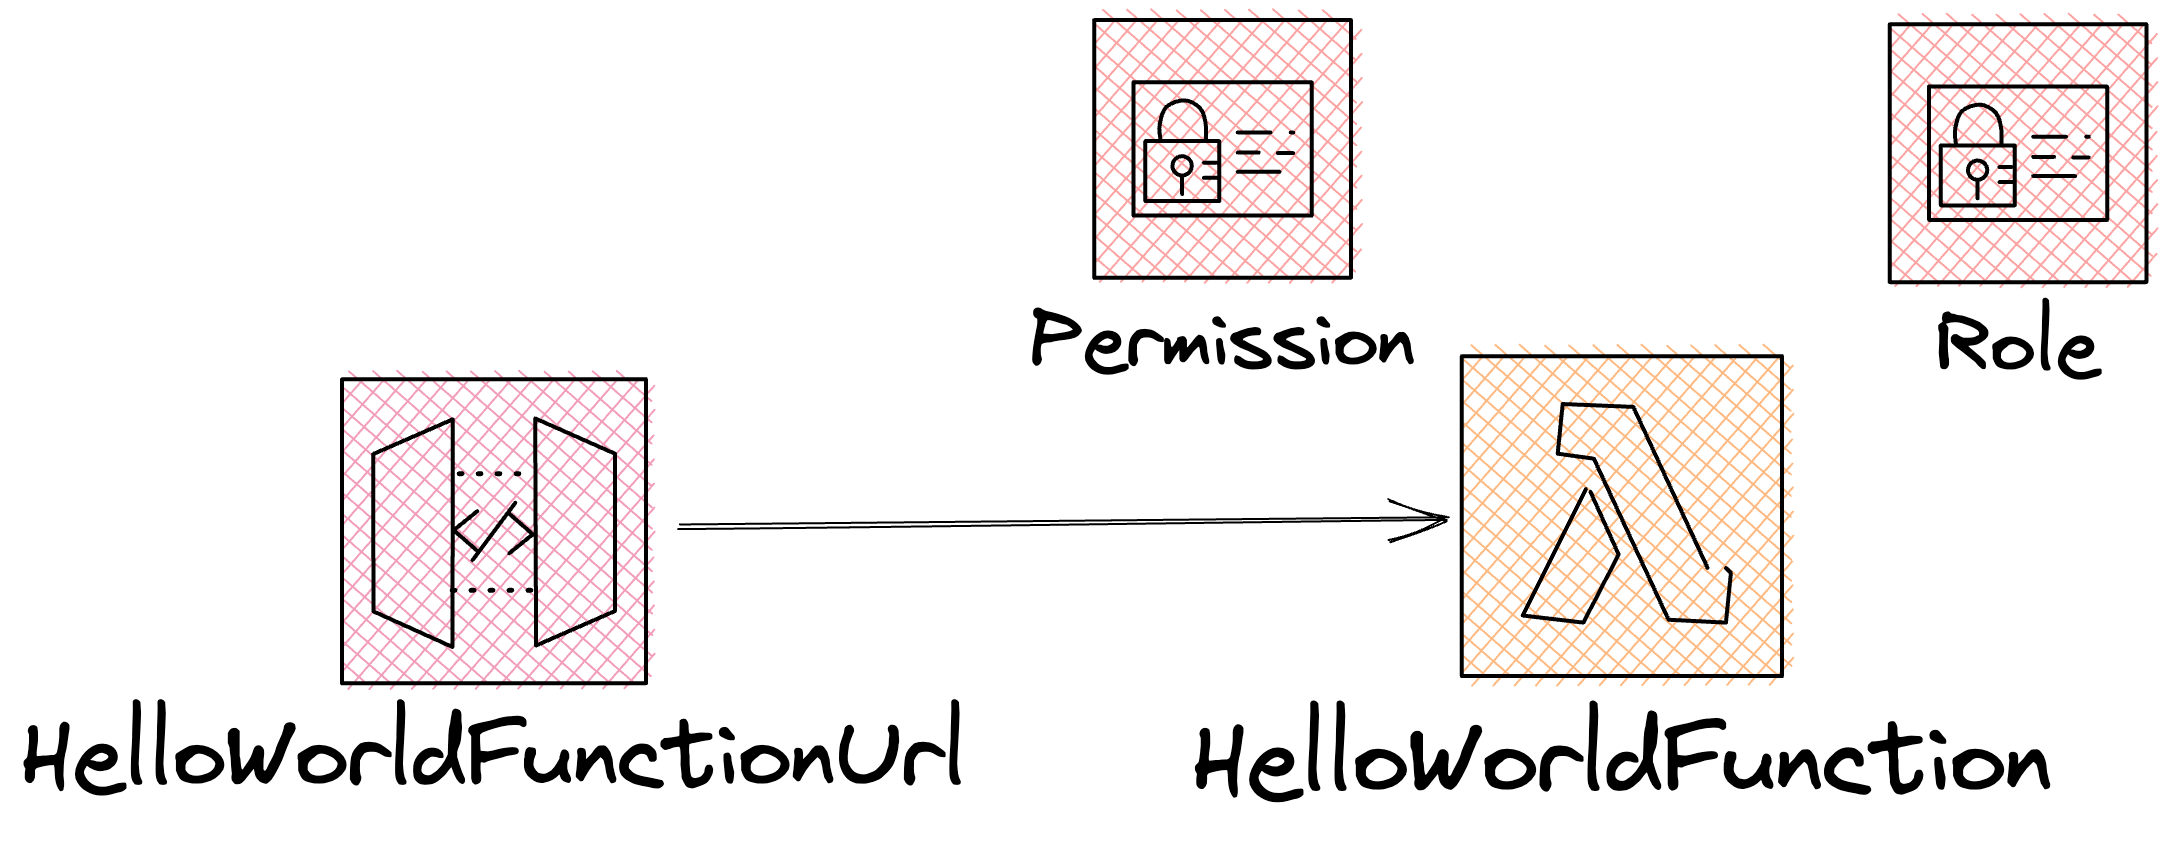
CloudFormation design
This is a key benefit to using CDK over writing CloudFormation directly - it allows us to much more easily define higher level patterns of groups of resources.
CDK as build and package tool
In this example we’re not just deploying infrastructure - that would be too easy! We’re also deploying code - the code which runs within our Lambda function.
There are many ways of deploying code in AWS, and in CDK there are even at least two ways of deploying code just to a Lambda Function.
In this example we are using CDK’s own build and package features. Specifically, because we’re using the NodejsFunction construct and not just the Function construct, CDK builds and packages our Lambda function code before it performs the deployment. How does it do that? Because of those entry and bundling properties I told you to ignore earlier! With this particular configuration, CDK:
- Knows that our top-level Lambda code is located at ../lambdaFunctions/api/lambda.ts (relative to the src/cdk directory)
- Runs esbuild to create a “transpiled” version of our Lambda code
- Configures the Lambda function to use this packaged version of code during deployment
Note that this example project also runs TSC - the TypeScript compiler - as part of the CDK process.
That’s because of the build property in cdk.json. Because of the noEmit configuration of TSC in tsconfig.json we only use this for performing type checking though.
I’m still in mixed minds whether CDK-as-build tool is the best idea for larger projects, but for simple ones like this it works well enough, and certainly reduces the amount of boilerplate in the project. If you want to see what it looks like to use custom build + package scripting outside CDK then see an earlier version of the project.
Other features of this template
The coffee-store-v2 project has a lot more going on than just CDK - it also gets you started with Lambda unit and integration testing, as well as using GitHub Actions for CI/CD. For more on those topics, see the README.
Teardown
Since the project deploys a publicly accessible resource you’ll probably want to delete the deployed app when you’re done. You can either do that by deleting the associated stack in the CloudFormation web console, or by running the following command:
$ npm run cdk-destroy
Next steps
Congratulations - you’ve now successfully deployed a Lambda application using CDK! CDK isn’t just for serverless applications though - it’s useful for deploying all types of AWS infrastructure too. For example, say you want to deploy a website using CloudFront and S3 - the template project for that is available here, and I’ll be going through it in another part of this blog series soon.
I hope you’ve found this article useful! Again, if you’re interested in hearing more about CDK I’d appreciate it if you subscribe for updates, if you haven’t done so already. Alternatively if you have feedback, or are interested in help, then drop me a line at mike@symphonia.io.