Using Identity Center for AWS Human User Management

Human user management - allowing people to correctly authenticate and securely use your systems - is a strangely important aspect of running AWS Accounts and Organizations. Done right it’s frictionless, allowing you and your colleagues to get along with what they actually need to do. But done wrong it can leave your resources open for attack by bad actors, and make people’s interaction with AWS miserable.
This article introduces you to AWS’ solution to this activity - IAM Identity Center. By the end of this article you’ll be able to configure appropriate and secure human user access across your entire AWS Organization with relatively little effort.
Welcome to Org Ops Part 3
This is the third article in my series on AWS Organization Operations - or Org Ops for short. This series describes how I recommend you approach managing the most fundamental resources in AWS for small-medium sized companies.
In Part 1 I explained why it makes sense for most companies using AWS to adopt a multi-Account AWS Organization, and what the shape of such an Organization might look like. Part 2 covered the activities involved with building the Accounts in such an Organization.
This article continues the story by explaining how to most effectively allow your coworkers to securely access the Accounts within your Organization. There are 2 parts to this article:
- What is AWS Identity Center, and what problems does it solve?
- How do you install Identity Center, and enable access to initial users?
What is Identity Center?
AWS IAM Identity Center is a service that allows you to manage the authentication and authorization of humans using AWS Organization Accounts and Applications.
There’s a lot to unpack in that sentence.
- Identity Center is a service. In other words it is a first-class feature within AWS, rather than a “bolt-on” reference example.
- Identity Center is used to manage authentication and authorization. It confirms who a requestor is, and based on their identity decides what specific resources they have access to and what operations they can perform on those resources. It provides you with tools to allow configuration of both aspects.
- Identity Center is used specifically for allowing humans access to resources. It is not involved with deciding whether one service can call another service, or whether external systems are allowed to access your own systems.
- Identity Center provides access to AWS Organization Accounts - it is a mechanism by which engineers can use the AWS web console and the AWS API / CLI / SDK across multiple Accounts within an AWS Organization. It is scoped to the Organization, and so it is aware of all the Accounts, and hierarchy, within the Organization.
- Identity Center also provides access to certain AWS Applications, like QuickSight - Amazon’s BI / Reporting tool. This article is focused on Account access, so I’m going to ignore the Applications aspect.
What problems does Identity Center solve?
Identity Center is a relatively new service within AWS. It was originally announced in late 2017 as AWS Single Sign-On (AWS SSO), and was renamed to IAM Identity Center in 2022.
Because there was a five year period where the service’s name was SSO you’ll still see documentation, resource names, or URLs that refer to SSO. Some (but not all!) CloudFormation resources are also named with SSO. But know that AWS SSO was Identity Center; it’s just been renamed (and extended).
Before Identity Center, the way people performed human user management in AWS was to use IAM Users. Unfortunately this technique is severely limited when you have multiple AWS Accounts, because each IAM User is specific to one Account, not one Organization. To enable access to multiple Accounts with IAM Users you need to either (a) provide each human with a different IAM User per Account, or (b) configure cross-Account federated access, e.g. using SAML. These workarounds have the following problems:
- Using multiple IAM Users per person, per Account, is extra effort for both users and administrators. Plus it opens the door to mistakes like accidentally leaving a user inaccurately configured, which is a security risk.
- The problem with implementing cross-Account federated access is this is hard to get right and maintain if it’s not something you need to configure frequently. And you really want to have this kind of thing nailed down to avoid security issues.
Identity Center solves these concerns - it exists to provide a simplified tool to allow humans to access to an Organization using one set of credentials per user. All of the federation-trickiness is abstracted, leaving both Administrators and Users with a much better solution than IAM Users provide.
Because of this, in general, I strongly recommend that all companies using AWS use Identity Center rather than IAM Users for human access.
I am going to discuss the use of Identity Center with AWS Organizations. Identity Center also supports being used within a specific AWS Account but (at time of writing) this is only for accessing Applications and not the Account itself.
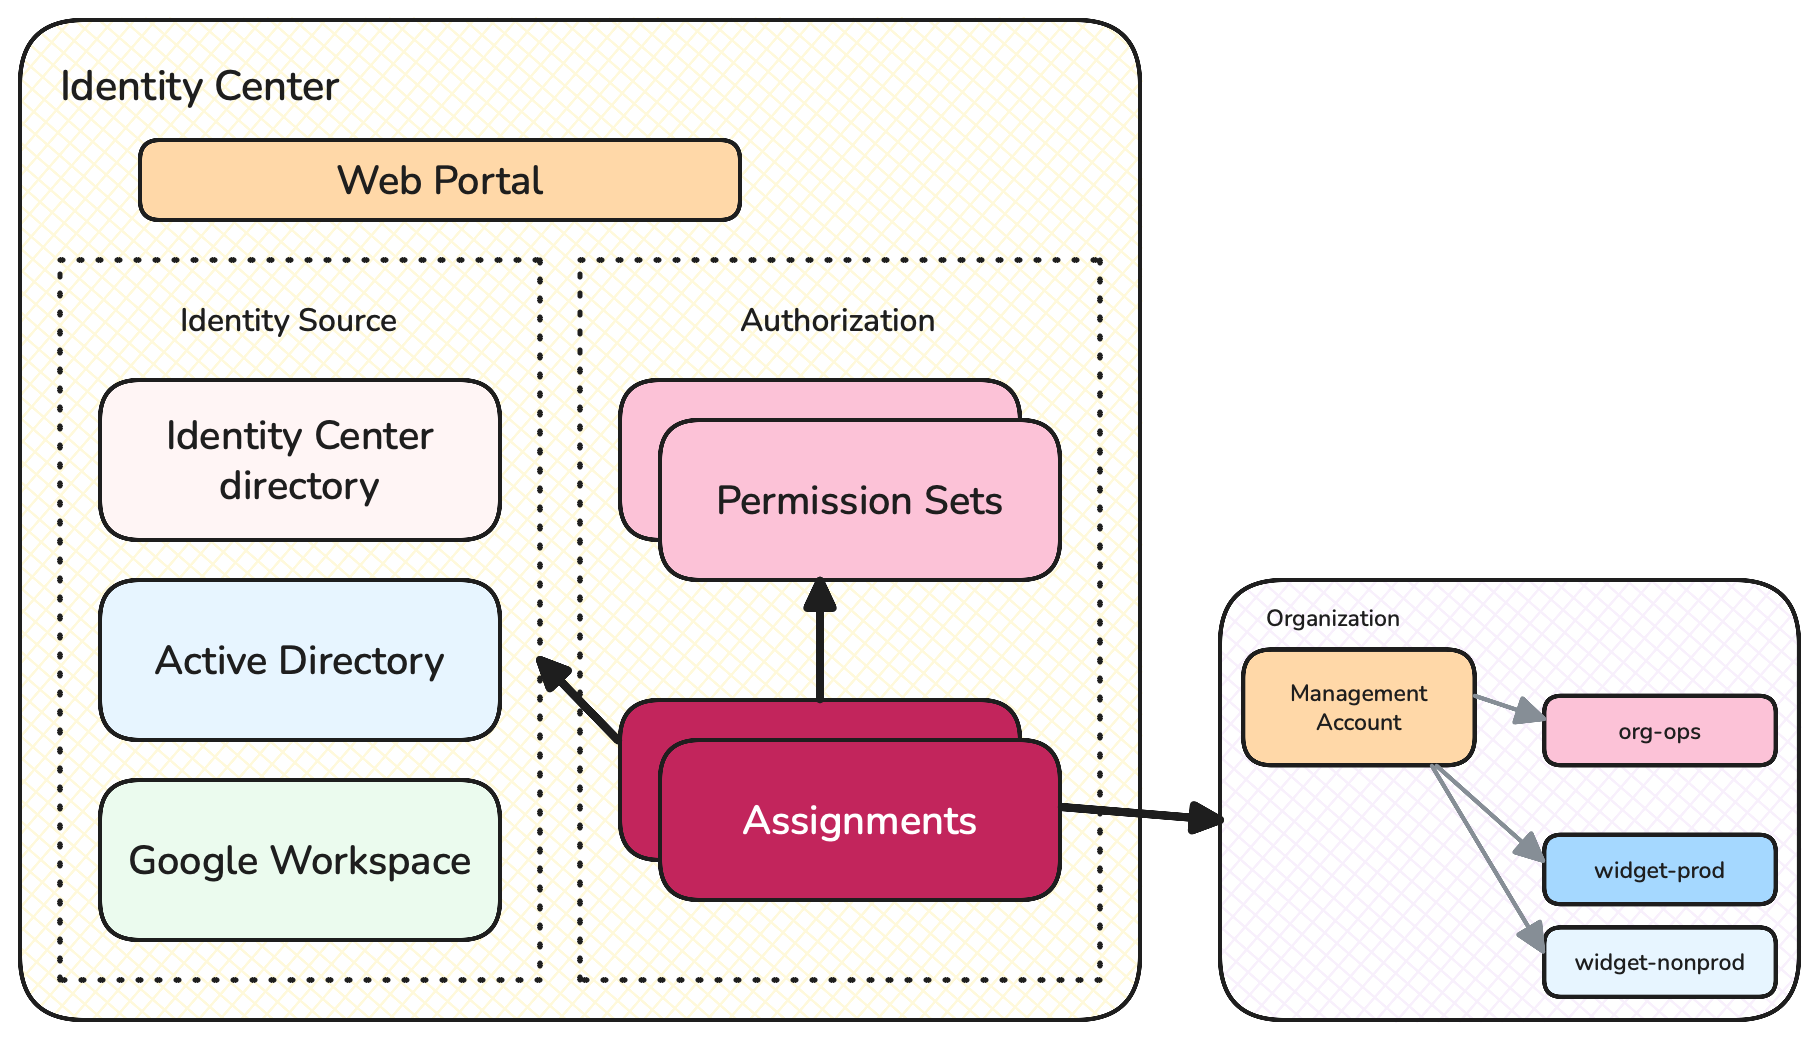
Identity Center components
Identity Center has three main components:
- User and authentication management with an Identity Source
- Authorization
- End-user interface
Identity Center Components
User management and authentication is performed by an Identity Source. An Identity source maintains a set of users, including managing their credentials - passwords, MFA, etc. It also allows putting users into groups.
The default Identity Source is the Identity Center directory. The Identity Center directory is a component within the larger Identity Center service that you can use for managing your company’s users and groups. However you can also use one of several other Identity Sources if you want to manage your users elsewhere, e.g. you can use Active Directory, Google Workspace, or others - see here for a complete list.
The main benefit of using the built-in Identity Center directory is that it’s the easiest to configure and use. The main benefit to using an alternative Identity Source is you can make use of the user and credential management you likely already have elsewhere in your company, therefore reducing duplication.
I typically recommend that to start you use the default Identity Center directory since it’s easiest to understand. You can always switch to an alternative later if you so choose.
Authorization
Once a user’s identity and group membership is confirmed by the Identity Source then they need to be authorized into their requested Account. The Account Authorization component of Identity Center implements this using two concepts:
- Permission Sets: define access over types of resources and operations
- Assignments: configure which users and groups have access to specific Accounts in the Organization, with permissions defined by a Permission Set
Under the covers, Identity Center is using a combination of SAML and IAM Roles to provide users with the correct access. But typically you don’t need to get into the weeds of this.
End-user Interface
Beyond just providing a backend management service, Identity Center also provides User Interface elements for end users. The most important component is a top-level web portal that users can use to sign in, access Accounts, and get temporary access keys. Additionally Identity Center integrates with the AWS CLI, allowing engineers to access AWS Account resources from their terminal.
That’s enough theory, onto more practical matters.
Setting up Identity Center for your Organization
For most of the rest of this article I’m going to describe what you need to do as if you’re setting up Identity Center in your Organization for the first time. I’m also assuming you have an Organization that has Accounts similar to those I described in Part 1 of this series, and that initially you are going to set up just your administration users.
If you already have Identity Center enabled for your Organization you may choose to review this section and compare with what you already have configured.
I recommend you read through this section before you actually sit down to make any changes. That’s because there are a few decisions to make, and you may want to think about them before starting rollout.
Login and select a region
The initial setup of Identity Center needs to occur as an administrator, in the management Account, in the AWS web console, so login using the root user (hopefully for the last time!) or as an admin IAM user if you happen to have one.
Next make sure the web console is running in the region that you want Identity Center to be installed in. Your web console’s region is shown in the top navigation bar towards the right side. One Identity Center instance works with any region, so it “feels” like a global service, however it actually runs out of one specified region, and you need to pick which one.
By default pick the region you are using for most of your workloads. The only thing to really care about is not to pick a region that you might expect to disable in future in your Organization, e.g. for geo-political reasons. The reason is that you can’t migrate Identity Center regions later - if you need to change the base region you use for Identity Center you’ll need to delete your Identity Center instance and start again.
For more specifics around picking a region, see the documentation.
Enable the Organization Identity Center
Now you can enable Identity Center, as follows:
- Go to the Identity Center Console
- Choose Enable (see screenshot below)
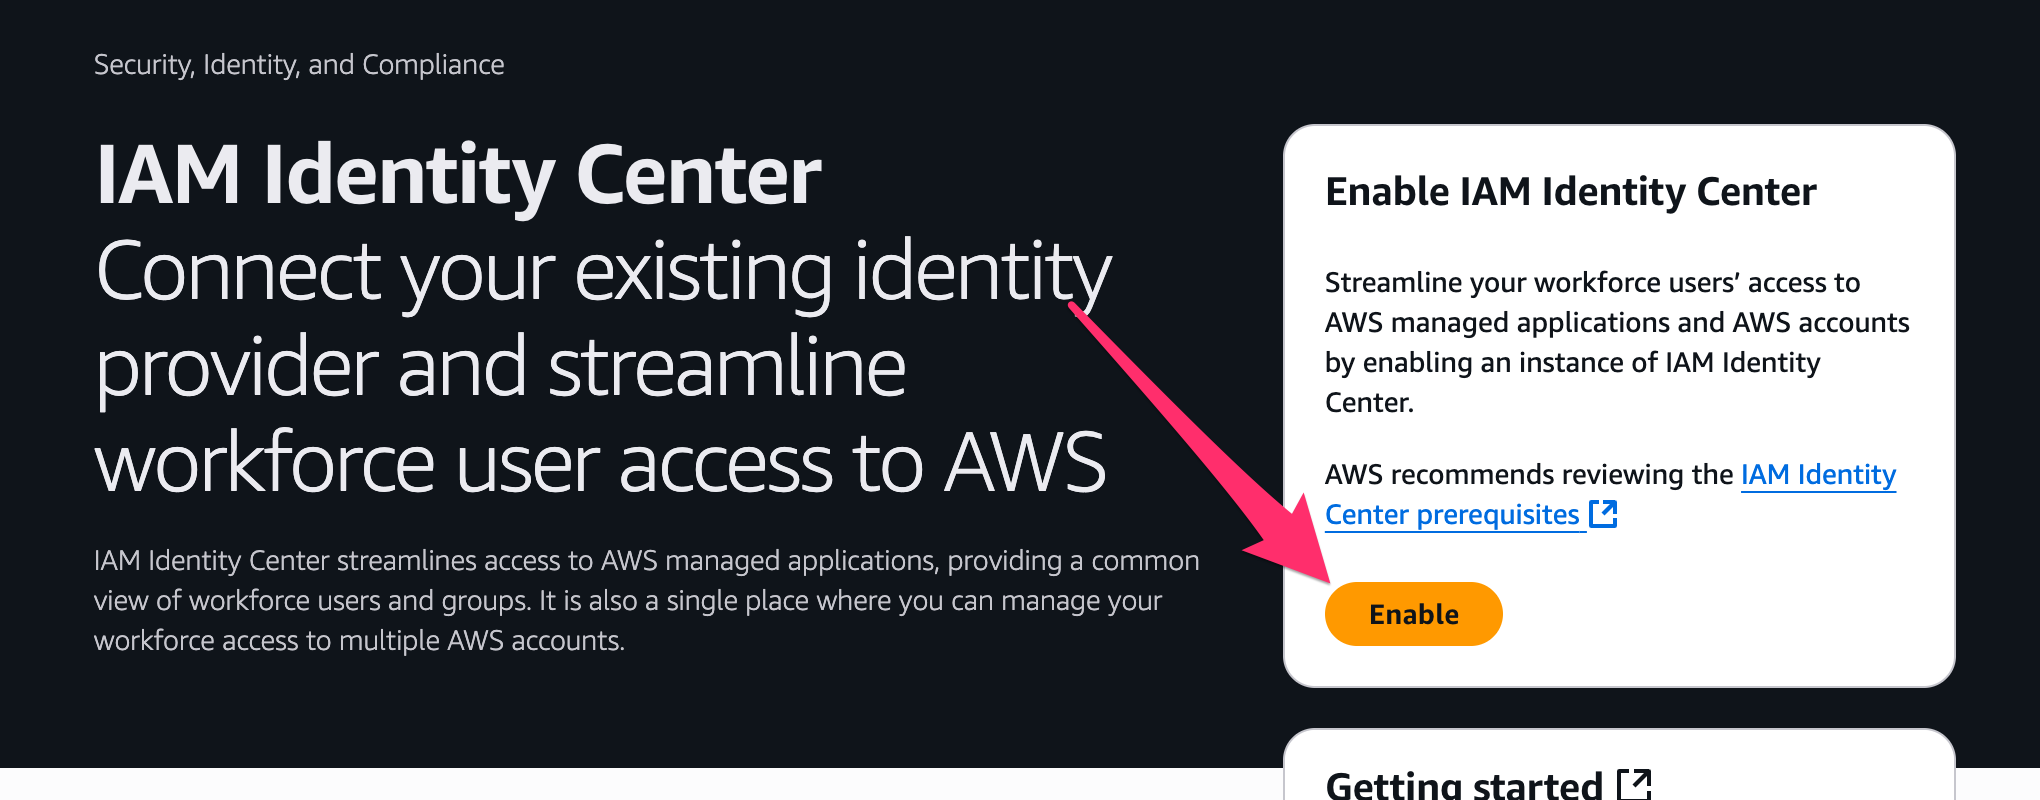
- The next specific UI can change here from time to time, but make sure you’re creating an Organization-scope Identity Center (not Account-scope), and continue
- After a few moments your Identity Center should be ready, and you should be able to see the Dashboard.
Unfortunately at the present time (July 2025) the default Dashboard UI after you enable Identity Center is very attention-thirsty, and not universally useful, so you can safely ignore most of the suggestions it makes.
A couple of things you can see are the configurable Instance Name and AWS access portal URL:
- Instance Name is not particularly useful, and really only makes sense for you to change if you have multiple Identity Centers (which you’ll only have if you’re also using Account-scope Identity Centers)
- AWS access portal URL would be a very nice thing to change - e.g. to your company name - HOWEVER this cannot be changed again, once set. So be careful! If you set this to your company name, and then your company gets acquired or has a change of identity, then you’ll be stuck with the old portal URL.
If necessary, select an alternative Identity Source
As I described earlier in this article, you have a choice as to where to store your users and their credentials. As I also mentioned I recommend picking AWS’ own Identity Center directory by default, but if you know for sure that you’re going to want to use an alternative then consider just using that from the start. See here for the list of available Identity Sources.
The next couple of sections of this article assume you use the default Identity Center directory Identity Source.
Change Authentication Settings
Before you start adding users and permissions there are a couple of global settings you may want to consider updating.
First: MFA. By default Identity Center will require users to set up MFA when they first sign in. This is usually a great choice, but make sure it’s appropriate for you.
Second: Session Duration. When your coworkers access AWS through Identity Center they are provided with a session. This session is temporary, and has a maximum duration. AWS defaults this to 1 hour - i.e. a user must sign in again at least every hour while they are using AWS. This 1-hour maximum duration makes sense for some security-sensitive companies, but honestly for most companies it’s just a friction point. I usually go with 12 hours, but you can use anything between 15 minutes and 90 days.
To change these settings:
- From the Identity Center console, pick Settings on the left side.
- You should be able to see an Authentication section - select it
- Within here you can update MFA, session duration, and various other configuration
Add first users
With Identity Center enabled, and global settings configured, you can start adding some users. If you’re using the default Identity Center directory then follow along with this section, otherwise you can skip ahead since you create and manage users in your existing external system.
To start I recommend you create just the initial “Organization Administrators” users - including yourself, if appropriate. These are the users that will have Administrative privileges in the management Account, and the “Org Ops” Account, if you’ve been following my recommendations from earlier articles.
At this point you also need to consider these questions:
- What are you choosing for your username format? You can always change this in future, but if you ever expect your company to have more than a handful of employees you probably don’t want to just use first name.
- What are the full name and contact details (email address at least) for each of the initial users?
To actually create the users (continuing as the root user in the management Account):
- From the Identity Center console, pick Users on the left side.
- For each user, select ‘Add User’, fill out the details, and confirm
A user will receive an email with some important details:
- A link to accept the invitation to join the Identity Center
- The Access Portal URL - they should keep this bookmarked since they will use it whenever they login to AWS in future
- Their username
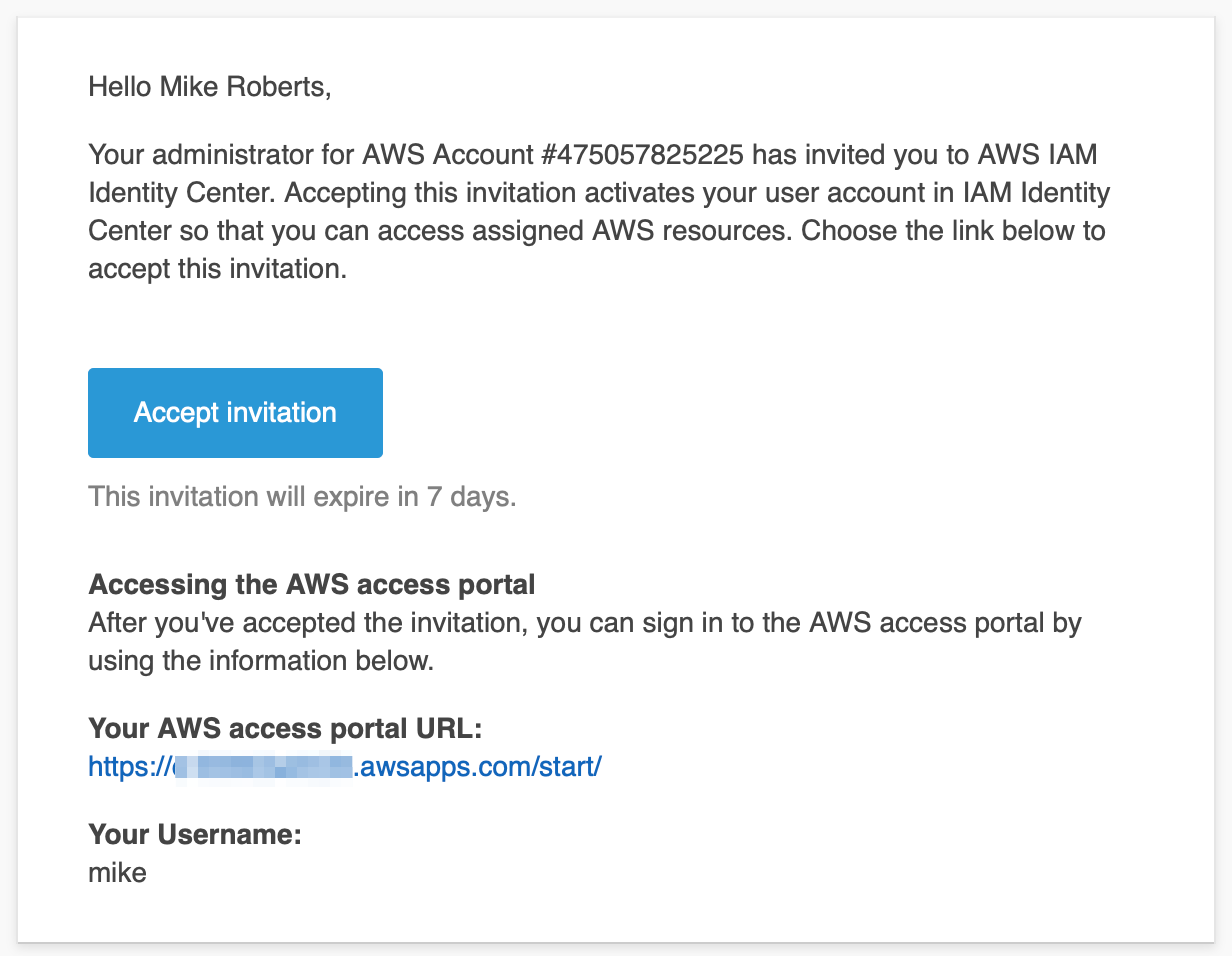
When they go to the “Accept invitation” link they will create their password and set up their MFA, assuming that you didn’t remove that from configuration.
Add initial user group(s)
At this point you can also create initial user groups. E.g. you may want to create an “Organization Administrators” group for the users you’ve created so far.
To create groups (continuing as the root user in the management Account):
- From the Identity Center console, pick Groups on the left side.
- For each group, select ‘Create Group’, and follow the UI
Assigning Permissions #1 - Create Permission Sets
At this point your administration users should be able to successfully login to the AWS console, but they won’t be able to do anything else yet. That’s because while they can successfully authenticate we haven’t yet assigned any permissions so that they can be authorized.
Assigning permissions with Identity Center is a little tricky at first because of the process it uses. My suspicion is that AWS have designed things this way because they scale well across many Accounts and types of role. But on first glance they don’t feel intuitive, to me at least.
The first step to assigning permissions is to create Permission Sets. A Permission Set is basically just a named group of security policies, which can then be modified later. One Permission Set can be used in multiple different assignments, which means if you choose to change some details of the policies of a Permission Set later you can do it in one place, and the change will apply to all the places the Permission Set has been assigned.
Permission Sets can use Managed Policies (standard groups of actions provided by AWS), Inline Policies (where the definition of each policy is completely defined within the Permission Set itself), or Customer Managed Policies (which are policies you define outside of Identity Center). A Permission Set can contain zero or more of each type of policy.
For now I’m just going to use one standard AWS Managed Policy, but eventually you’ll likely need to learn more about how to define custom AWS Policies if you don’t already.
To create a Permission Set (continuing as the root user in the management Account):
- From the Identity Center console, pick Permission sets on the left side
- Select Create permission set
- Follow the UI for assigning permissions. To create a Permission Set for Organization Administrators pick Predefined permission set and then choose the AdministratorAccess policy
- On the next screen fill out the name, and optionally a description. You may also want to change the session duration - I usually set this to the same length that I set as the default for my Identity Source (see “Change Authentication Settings” earlier).
- For now you can ignore Relay state
- Go to the next screen, review, and confirm
Assigning Permissions #2 - Assign Accounts
After you’ve created a Permission Set you can create Account assignments to complete the process to assign permissions. Continuing as the root user in the management Account:
- From the Identity Center console, pick AWS Accounts on the left side
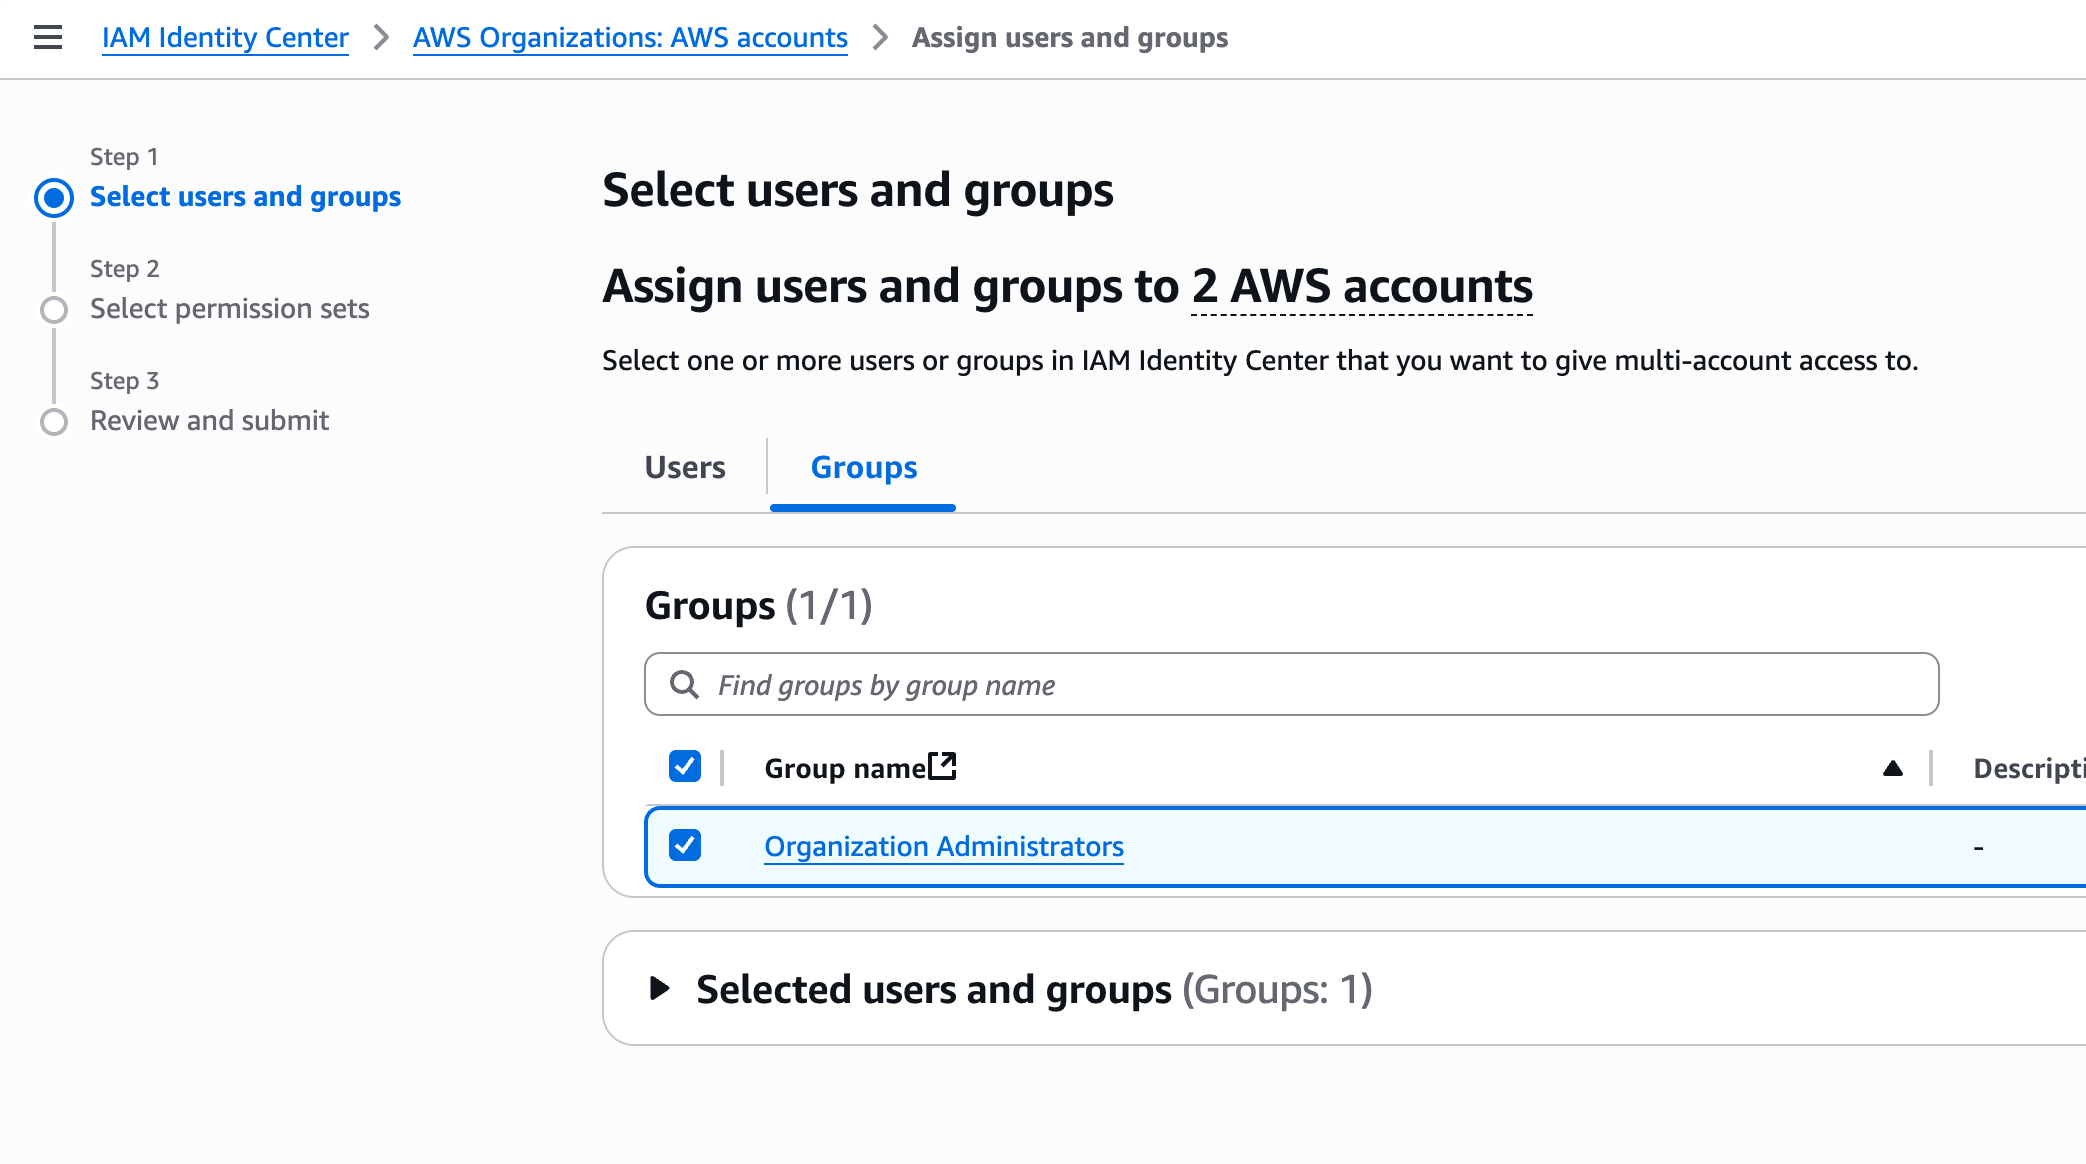
- Select, using the check boxes, the Accounts which you want to assign access to - which might be all of the Accounts in the Organization
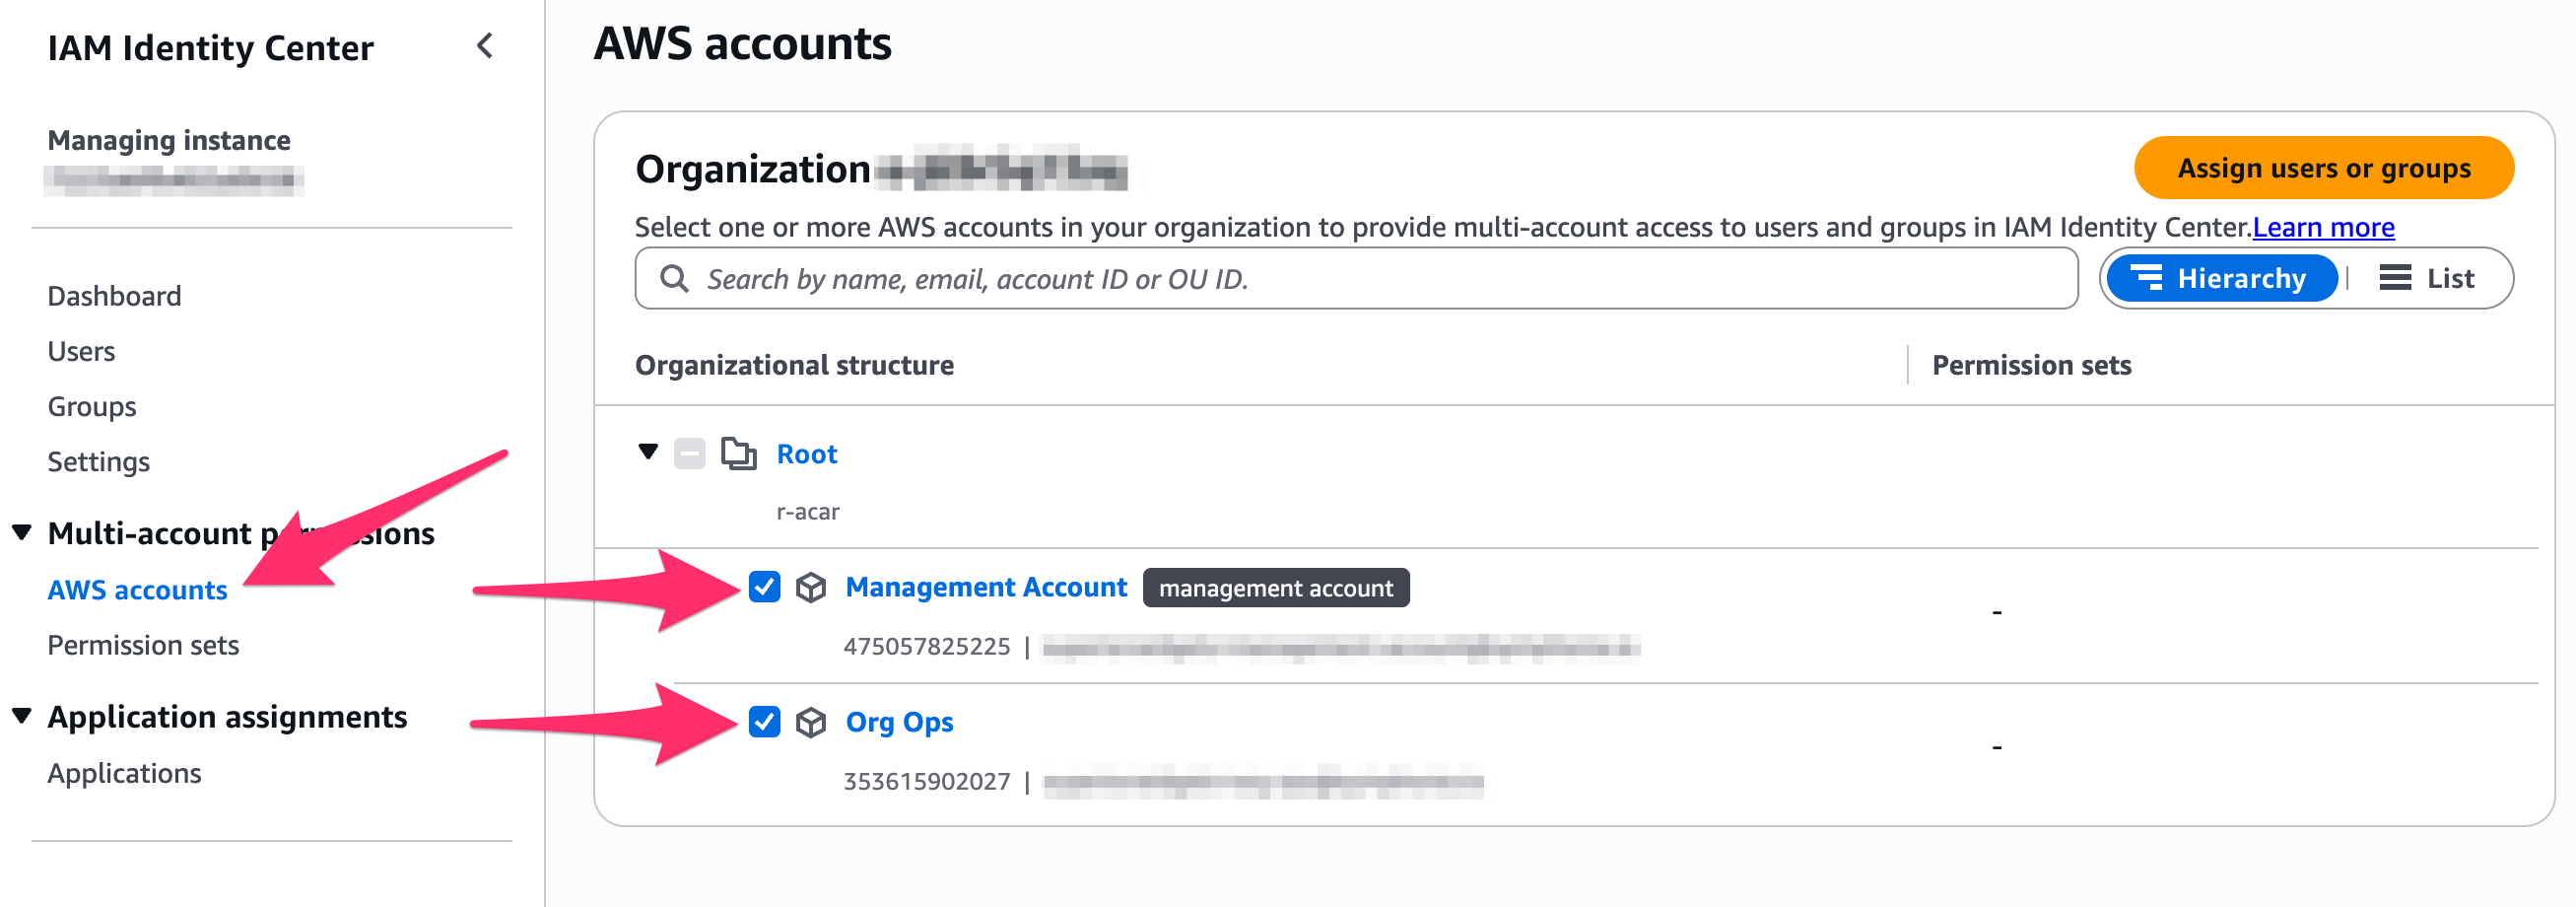
- Press Assign users or groups
- Choose all of the users and groups for whom you want to assign access - e.g. from the Groups tab pick Organization Administrators if you created such a group earlier. Press Next.
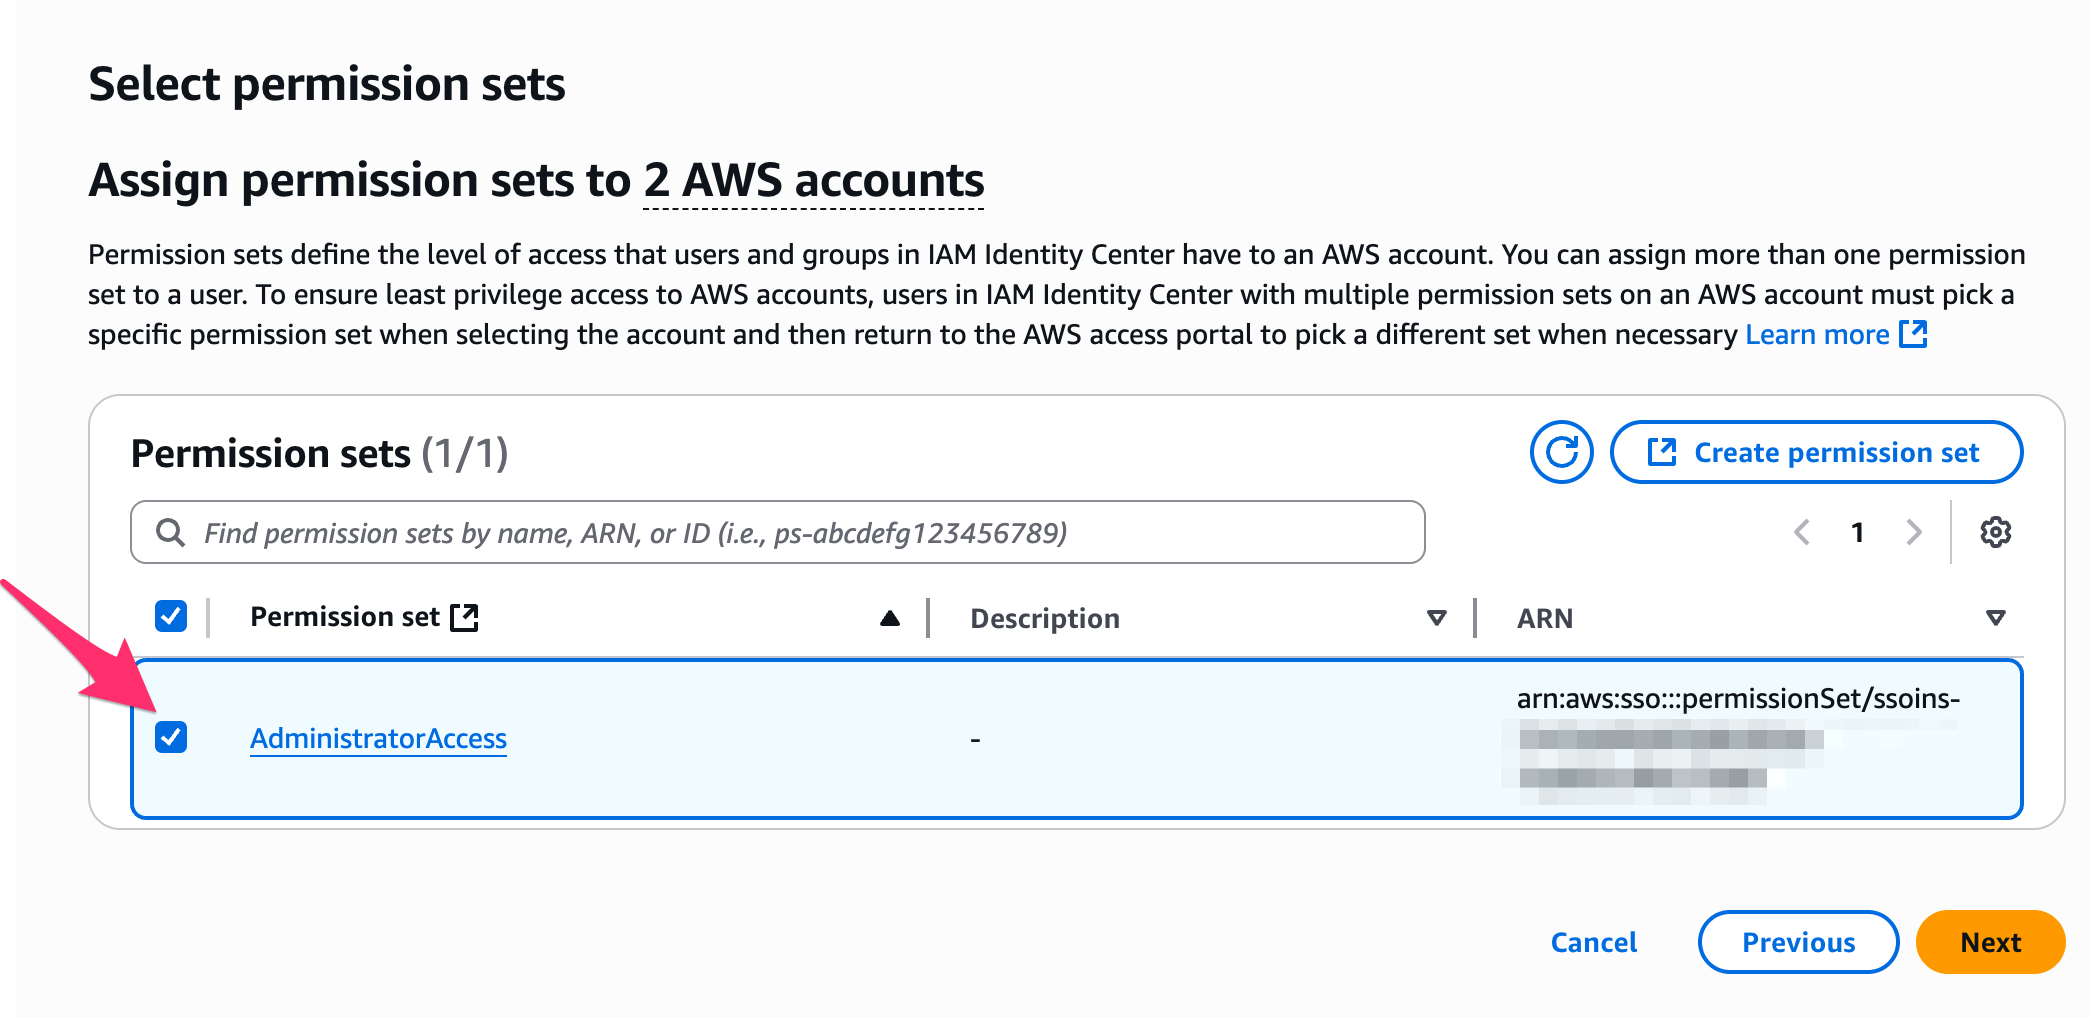
- Choose all of the Permission Sets which you want to grant your selected users to have in these Accounts. E.g. pick the AdministratorAccess Permission Set if you created that in the previous section. Press Next.
- Review the summary, and select Submit if everything looks OK.
There will be a small delay while Identity Center executes the change, and then when you select AWS Accounts on the left you should see the list of Accounts has been updated with the Permission Sets associated with them.
If you have assigned yourself Organization Administrator privileges you should now be able to sign out from the console as the root user, sign in as your own user, and have full Organization admin access!
Delegate Administration Account
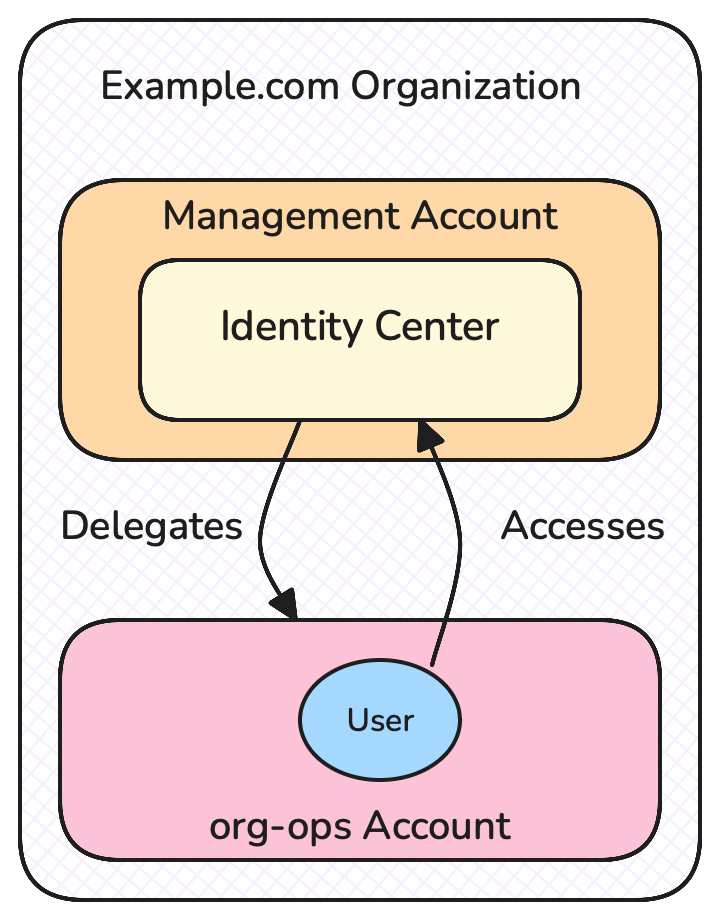
I mentioned in Part 1 of this series that it makes sense, for security reasons, to perform as little work as possible in the Organization management Account. But all of the changes I’ve described so far take place in that management Account, which goes against this rule.
Now that you’ve completed initial setup there’s one more configuration change I recommend to align with my earlier guidance - to assign a delegated administrator Account for Identity Center.
Assigning a delegated administrator means that Identity Center configuration actions can be performed from an assigned member Account instead of the management Account. The Identity Center instance is still “stored” in the management Account, we’re just allowing a different Account to configure it. Practically this means that I, or any automated tooling, only need to be running in the context of the delegated administrator Account to make Identity Center changes, rather than having elevated privileges to the management Account.
- From the Identity Center console, choose Settings on the left side, then under Management choose Register Account under Delegated Administrator
- Choose the Account you want to make the delegated Administrator, then press Register Account
Once AWS has made the change you should be able to go back to the Account Switcher screen within the Identity Center access portal, login to the delegated Account, and make future Identity Center changes there.
Where’s the Automation and Infrastructure as Code?
Most of Identity Center’s configuration can be automated, including being defined with Infrastructure as Code. There are some caveats though:
- Initialization for an Organization-wide instance of Identity Center has to be performed through the web console
- Users in Identity Center directory can be created and updated with the AWS CLI / API but not currently with CloudFormation
- When working with a brand new Organization you won’t yet be in the state where you can assign security credentials for an external automation tool.
As such, I recommend that for your very first initialization that you use the web console, and also use the web console to create a minimal set of users and assigned permissions. The web console UI does a decent job of guiding you through creating Permission Sets and Assignments, which can otherwise feel a bit abstract when you’re getting used to them.
Once you have more of your Organization configured, eg for external automation, you can come back and add Identity Center deployment automation - and I recommend doing so. Except for managing users you can put everything else - group membership, Permission Set policies, and role assignments - in version control and put them under a CI / CD process.
Next Steps
Since I’ve just mentioned deployment automation it’s probably about time we set that up. I’ll explain how to think about getting started with Infrastructure-as-Code with an Organizations mindset in the next article.
Summary
In this article I explained what AWS Identity Center is, and why you almost certainly want to use it for human user management of AWS Organizations.
I also showed how you can configure Identity Center, including the following tasks:
- Initialization, with consideration for base region
- How to consider which Identity Source to use
- Setting global configuration, including MFA and maximum session duration
- Creating your first users and groups
- Assigning privileges to users and groups in specific Organization Accounts using Permission Sets and Assignments
- Delegate future administration of Identity Center to a member Account in the Organization
This initial configuration puts you in a good place to have an appropriate security posture for human access to your Accounts, while also reducing friction for administrators and end users.
Feedback + Questions
If you have any feedback or questions then feel free to email me at mike@symphonia.io, or contact me at @mikebroberts@hachyderm.io on Mastodon, or at @mikebroberts.com on BlueSky.