AWS Organization Deployment Automation with GitHub Actions

Any company that wants to fully automate the deployment of resources and software to a cloud vendor is faced with a choice - what top-level automation tooling should they use? Many companies that use AWS choose GitHub Actions. At first this might seem strange - after all AWS has its own tools for this activity and there are benefits to keeping deployment tooling colocated with the resources it’s deploying.
However GitHub Actions has some real development experience (DX) benefits over AWS’ own tools, and also many companies already use GitHub Actions for their code-oriented CI/CD (Continuous Integration, Continuous Delivery / Deployment) requirements. And so it makes sense for them to push the use of GitHub Actions further, into the realm of deployment to AWS.
This article shows you how you can enable GitHub Actions to work with your AWS resources, and how you can use GitHub Actions to maintain your AWS Organization.
Welcome to Org Ops Part 6
This is the sixth article in my series on AWS Organization Operations - or Org Ops. This series describes how I recommend you approach managing the most fundamental resources in AWS for small-medium sized companies.
Parts 1 and 2 covered the “why” and “how” of using a multi-Account Organization in AWS. Part 3 covered human user access.
Part 4 of this series described using Infrastructure-as-Code (IaC) for managing Organization resources, and started the story about automation. Part 5 carried on the thread by describing how you can use the concepts of deployment automation in Org Ops - both how to enable deployment tools to safely access your AWS Accounts, but also how you can use deployment automation tools as part of the process of managing the Organization and Accounts themselves.
Part 5 provided some examples, but didn’t go into detail. In this part 6 I’ll take you on a deep dive into a full solution of using GitHub Actions for deployment automation. Even if you use a tool other than GitHub Actions you’ll be able to take the patterns here and translate them for use in your context.
Specifically I cover the following activities:
- Bootstrapping and maintaining GitHub Actions admin access for Accounts - and detailing how to call AWS from GitHub Actions
- Managing access to AWS for application repository workflows
- Managing cross-account deployment of organization-managed resources, with CDK Bootstrapping as an example
I strongly recommend you read Part 5 before this Part 6, since this article is largely about giving examples for what I described in the previous part.
Follow along in the GitHub repository
All the examples in this article are available in the public companion GitHub repository here. Note the example repository isn’t just theoretical! All the workflows and deployment processes actually run against a real AWS Organization.
The following directories in the example repository are used in this article:
- /githubActionsOIDC - scripts and templates for deploying workflow roles, and OIDC providers
- /cdkBootstrap - scripts and templates for deploying a CDK Bootstrap stack per Account
- /.github/workflows - The GitHub Workflows used for automation of the previous two types of resource
Bootstrapping and maintaining GitHub Actions admin access for Accounts
The first thing I need to do is enable GitHub Actions to be able to use my AWS Organization at all. This requires deploying two resources to each account:
- An OIDC provider, to allow GitHub to authenticate with AWS
- An IAM Role that can be used by administration workflows in the Org Ops source repository
There are 4 separate steps that I go through in order for this to happen:
- Define the resources with Infrastructure-as-Code
- Define a CloudFormation StackSet to deploy the resources to all Organization Accounts
- Deploy the StackSet manually for the first time
- Use a GitHub Actions workflow to maintain updates to the StackSet over time
Define the GitHub Actions Admin stack
For various reasons (including the fact that there’s a CloudFormation StackSet lurking just around the bend) I define the OIDC provider and role using CloudFormation. A template to deploy these resources looks as follows:
AWSTemplateFormatVersion: 2010-09-09

Resources:
  GithubOidc:
    Type: AWS::IAM::OIDCProvider
    Properties:
      Url: https://token.actions.githubusercontent.com
      ClientIdList: [ sts.amazonaws.com ]

  OrgOpsRepoRole:
    Type: AWS::IAM::Role
    Properties:
      RoleName: GithubActionsRoleOrgOpsRepo
      AssumeRolePolicyDocument:
        Statement:
          - Effect: Allow
            Action: sts:AssumeRoleWithWebIdentity
            Principal:
              Federated: !Ref GithubOidc
            Condition:
              StringLike:
                # Only allow from main branch in the aws-org-ops repo
                token.actions.githubusercontent.com:sub: 'repo:superior-widgets/aws-org-ops:ref:refs/heads/main'
      ManagedPolicyArns:
        - 'arn:aws:iam::aws:policy/AdministratorAccess'
Based on what I covered in Part 5, you may be able to understand this from what I’ve covered so far, but in case not this template defines:
- the Account-global OIDC provider for allowing automated authentication from GitHub Actions
- an IAM role to allow workflows running in the context of the main branch of the superior-widgets/aws-org-ops repo to have administrator access to the whole account.
I mentioned in Part 5 that it is hugely important to get the Condition property correct in AssumeRolePolicyDocument. If you get it wrong you can accidentally allow far more workflows, repositories, and even users / organizations to access your AWS resources. The Condition property is extremely flexible based on what GitHub sends to AWS in authentication requests, e.g. you can use the existence of Pull Requests, GitHub Environments, and more. See here for examples.
Define a StackSet
I’m not going to deploy the previous template directly though. I want to deploy the stack above to every Account in my Organization, and I want that to happen whenever I create a new Account - without having to update the definition in source control. The trick here is to use a CloudFormation StackSet, a technique I introduced in part 4.
The idea is as follows:
- I deploy a single stack to the Org Ops account in our Organization, which contains one resource - a StackSet. The StackSet contains embedded within it a target template, which looks like the one I just showed above.
- When the StackSet itself is deployed or updated then the CloudFormation StackSets service will take the target template, and deploy that as a CloudFormation target stack to all configured Accounts and Regions
- In our case such Accounts are all Accounts within either the “Applications” or “Operations” OUs of the AWS Organization hierarchy
- I configure the StackSet so that when new Accounts are added within either of these OUs then they automatically have the target stack deployed to them without doing any further work - this is the main benefit of using a StackSet vs a more standard “fan out” approach.
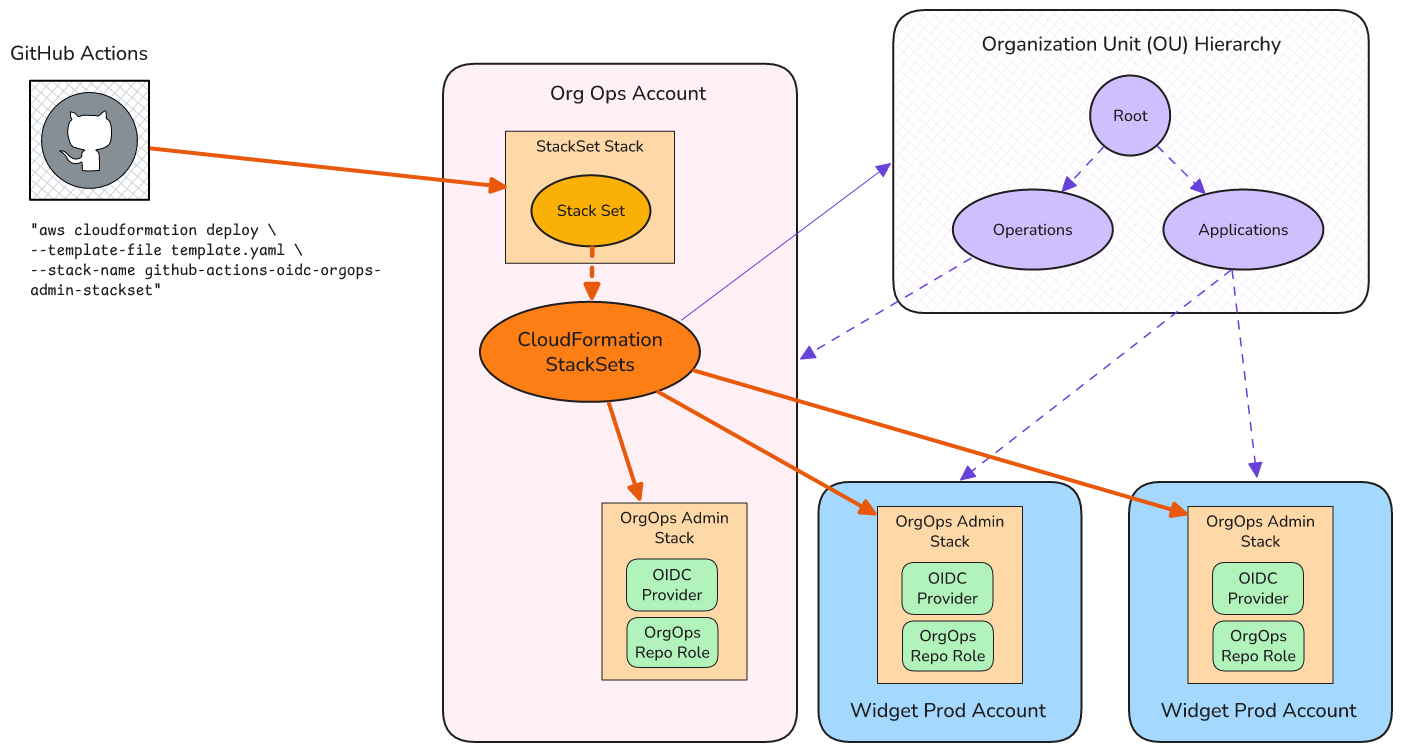
Configuring the StackSet template is tricky and precise. But you can see it in the public example repo here, and I’ve included line-by-line comments to explain what’s going on.
Deploying the Stack Set for the first time
The target stacks are deployed to every Account by the StackSet service. But I still need to deploy the StackSet itself. I want the deployment of the StackSet to be automated by GitHub Actions, but the very first deployment needs to be manual. This is because of the bootstrapping problem I described in the previous article: “To be able to deploy resources to AWS, our deployment automation tool first needs to authenticate with AWS and assume a role … but to do so requires the very same resources that this workflow will deploy.”
This first deployment is fairly simple but it does require having a terminal with the AWS CLI available, and configured with an AWS profile that has admin access to the Org Ops account. Once I have those things I can run the same deployment script that I’ll also use from GitHub Actions.
Use a GitHub Actions workflow to maintain updates over time
If the previous step completes successfully, and the StackSet service does its job deploying all the target stacks, then I’m now ready to actually use GitHub Actions to deploy to AWS! So let’s do that.
This article is not a tutorial on how to use GitHub Actions in general, so I assume that you have a basic understanding of GitHub Actions workflows, workflow configurations, jobs, steps, triggers, etc.
The full workflow configuration for deploying my StackSet stack is here in GitHub, but since this is the first workflow I’m covering I’ll describe a few parts in detail.
Important - these examples all use the latest version of various actions (defined by
@X) at time of writing. If you’re writing your own versions make sure to use the right version for you.
Triggering the deployment
The first thing to cover is what activity triggers the workflow.
Usually I want the activity to occur automatically whenever relevant changes are made to the main branch of my operations source code repository, perhaps after it’s been reviewed on a branch. I also want to be able to manually trigger the deployment from the GitHub UI - this is useful if something in the larger environment changes.
In GitHub Actions I do this with an on section:
on:
  push:
    branches:
      - main
    paths:
      - '.github/workflows/githubActionsOIDCOrgOpsAdminStackSet.yaml'
      - 'githubActionsOIDC/orgopsAdmin/*'
  workflow_dispatch:
This configuration satisfies my criteria. The paths filtering section makes sure that if I push something unrelated in the repository then I don’t get unnecessary runs of the workflow.
Setting up the environment
The next few lines of the configuration define a few things about the environment.
This line makes sure the workflow runs at most once at a time, to avoid any clashes if two triggers have occurred (strictly speaking CloudFormation will handle this for us, but I always like to make this requirement more explicit):
concurrency: ${{ github.workflow }}
Next I need to explicitly specify the permissions of the workflow - this is necessary because I’m using OIDC to connect to AWS:
permissions:
  id-token: write   # This is required for OIDC
  contents: read    # This is required for actions/checkout
With GitHub actions all deployment commands are performed on a host environment known as a runner. It’s very typical, at least for smaller companies, to use a standard GitHub-hosted runner. GitHub manage their hosted runners on your behalf. For example I can use this within the job configuration of my workflow to use the standard Linux runner:
jobs:
  deploy:
    runs-on: ubuntu-latest
This runner has a lot of software already installed for me, including the AWS CLI (the list of pre-installed software in ubuntu-latest at time of writing can be seen here). For this particular example the only IaC software I need to deploy the CloudFormation stack is the AWS CLI, so just using this runner is enough for running the IaC tooling.
Gathering IaC definitions
With GitHub Actions, workflows are contextualized to a particular source repository: the repository that the workflow definition is stored in (under /.github/workflows). When a workflow runs I can tell it to retrieve the source for the repo that it’s in as follows:
steps:
  - uses: actions/checkout@v4
This will actually clone the entire Org Ops repository tree, but it’s usually small enough that this doesn’t cause performance problems.
An important point here is what repository branch this uses, which is implicitly defined by the context in which the workflow was run. In the trigger section earlier I specified that the workflow should run when pushes to the main branch occur, in which case this checkout will also use the main branch. Alternatively if I trigger the workflow manually (which I can do because I specified workflow_dispatch in the on section) then GitHub has me choose which branch the workflow should run with, and the checkout step will use that branch. This can be useful for emergency patch changes.
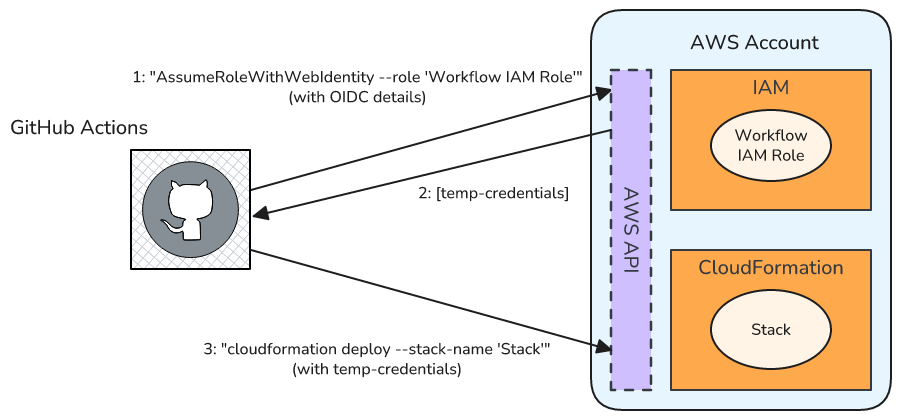
Configuring AWS access
Finally I can put all of our hard work of setting up OIDC providers and roles to use - configuring the runner’s AWS access. AWS provides a custom Action to make this easier for me, which I can use as follows:
- uses: aws-actions/configure-aws-credentials@v4
  with:
    role-to-assume: arn:aws:iam::353615902027:role/GithubActionsOrgOpsAdmin
    aws-region: us-east-1
I need to provide the full ARN of our role, and the Region to use. In this case I use the same Account and Region that I originally deployed the StackSet within, i.e. my Org Ops Account and us-east-1. Here I hard-code these values; in the examples below I show how I can use variables instead.
What’s actually happening under the covers here is that the AWS Action is calling AWS, using the AssumeRoleWithWebIdentity API, to get temporary credentials that have the permissions of our desired role. The Action takes the resulting credentials and stores them in environment variables for subsequent calls to the AWS API / CLI (e.g. to run CloudFormation). If you want to know more then this AWS blog article has more information.
Run our IaC tooling
Finally I can run CloudFormation. Some people choose to call IaC tools directly from the deployment automation definition, but I strongly prefer using an intermediary script instead. That way I can run the same script from my own machine either to test deployment or run deployment to a development environment. In this particular case I can run precisely the same script that I used in the first manual deployment.
All commands within the script are run on the GitHub Actions runner with the same environment that the script itself was run with - including the temporary AWS credentials that were captured in the previous step.
I run a script in the GitHub Actions job with the following step:
- name: Deploy StackSet
  working-directory: ./githubActionsOIDC/orgopsAdmin
  run: ./deploy.sh
The script itself includes this command:
aws cloudformation deploy \
	--template-file template.yaml \
	--stack-name github-actions-oidc-orgops-admin-stackset
This invokes CloudFormation with the Account, Region, and role I defined in the previous step. I specify the template to use, and the name of the CloudFormation stack to deploy the resources within. aws cloudformation deploy creates the stack if it doesn’t already exist, otherwise it will update the existing stack.
And that’s it! Now if I ever change something about our OIDC Admin template it will be automatically deployed when the changes are pushed to the main branch.
Managing access to AWS for application repository workflows
In Part 5 I described how it makes sense to separate deploying the roles used for administration workflows from those used for application workflows. In the previous section I showed how to deploy the admin workflow roles, so now it’s time for the application workflow roles.
This process is more simple than the previous section for a couple of reasons:
- I don’t need a manual first deployment since I can use the already-deployed admin workflow roles to deploy the application workflow roles
- I use standard CloudFormation deployment instead of StackSets
So for this example there are only two steps:
- Define the application workflow roles
- Use a GitHub Actions workflow to automate deployment of the roles
A few points of context for this example:
- I want to deploy an application named “Widget”.
- The source code for widget is in repository widget-app . (You can’t see this repository, but I can still set up the roles for its workflows).
- Widget is deployed to two AWS Accounts - Widget Prod and Widget Dev.
In Part 4 I described how an alternative to using StackSets for deploying to multiple Accounts is to use a “fan out” technique within the deployment automation tool. That’s what I do in this case.

Define the role stacks
The first step is to use Infrastructure-as-Code to define the roles. In this case I’m going to use CloudFormation as my IaC tool to avoid introducing another tool.
It’s technically perfectly fine to use different IaC tools for different parts of your Org Ops scope. However it likely makes sense to only use one or two to avoid having to learn to use multiple tools for one area of your work.
I could in theory use different CloudFormation templates for different Accounts, however I use a trick that means I only need one template, and because of that my scripting is the same for each Account. I like this method because it keeps very similar resources that have security aspects to them grouped in one file — making it easier to spot mistakes.
The full template is here. Here are a few things I want to point out:
Picking the right resources for the Account
I deploy the same template in both of the Accounts, but I want to deploy a slightly different role for each Account. The way I do this is to use CloudFormation Conditions, and specifically I want CloudFormation to look at the AccountID it’s running in, and deploy the right resource accordingly. I do this as follows:
First I define the absolute Account IDs for the prod and dev Accounts:
Parameters:
  WidgetDevAccountID:
    Type: String
    Default: '024697548467'

  WidgetProdAccountID:
    Type: String
    Default: '820178564478'
Then I create conditions that will be true only if CloudFormation is running in a particular Account
Conditions:
  IsWidgetDevAccount: !Equals [ !Ref AWS::AccountId, !Ref WidgetDevAccountID ]
  IsWidgetProdAccount: !Equals [ !Ref AWS::AccountId, !Ref WidgetProdAccountID ]
Then, for each resource, I use a Condition property which only deploys the resource if the particular condition holds. E.g. for the dev account’s role (WidgetDevWidgetReposRole) I have this:
WidgetDevWidgetReposRole:
  Type: AWS::IAM::Role
  Condition: IsWidgetDevAccount
Note that it’s perfectly reasonable to use more simple CloudFormation, e.g. having a template per Account. In that case you’ll need to perform the Account switching in your deployment scripting.
Defining the roles
The actual roles themselves look very similar to those I specified for the Admin workflows. Here’s the Dev account’s role:
WidgetDevWidgetReposRole:
  Type: AWS::IAM::Role
  # This role will ONLY be deployed when deploying this template in the Widget Dev Account
  Condition: IsWidgetDevAccount
  Properties:
    RoleName: GithubActionsWidget
    AssumeRolePolicyDocument:
      Statement:
        - Effect: Allow
          Action: sts:AssumeRoleWithWebIdentity
          Principal:
            # Deployed in orgopsAdmin GitHub OIDC stack
            Federated: !Sub arn:aws:iam::${AWS::AccountId}:oidc-provider/token.actions.githubusercontent.com
          Condition:
            StringLike:
              # Only allow from any branch in the widget-app repo
              token.actions.githubusercontent.com:sub: 'repo:superior-widgets/widget-app:*'
    ManagedPolicyArns:
      - 'arn:aws:iam::aws:policy/AdministratorAccess'
The only difference to the admin workflows is the Condition property - in this case this role can be assumed by any workflow, on any branch, in the widget-app repo.
WidgetProdWidgetReposRole on the other hand is different to WidgetDevWidgetReposRole because it only allows deployment from the main branch. I.e. compare this for the dev role:
StringLike:
  # Only allow from any branch in the widget-app repo
  token.actions.githubusercontent.com:sub: 'repo:superior-widgets/widget-app:*'
vs. the prod role:
StringLike:
  # Only allow from main branch in the widget-app repo
  token.actions.githubusercontent.com:sub: 'repo:superior-widgets/widget-app:ref:refs/heads/main'
This is a technique to protect the production environment from development work, and is very typical if you are protecting your branch in GitHub itself. You can actually get much more complicated than this, e.g. using GitHub Environments to protect your production account in more specific ways.
Finally, I’m using AdministratorAccess as the policy. Honestly, that’s a little lazy of me. :) Normally I’d use more restricted permissions here, at the very least using AWS Power User policy. But I’ve decided to use extra permissions to make the examples easier to work with. In your real role definitions I recommend tightening up your policies.
Configuring the GitHub Actions Workflows
Now I can deploy my role stacks. If I define the application workflow role stacks in the aws-org-ops GitHub repo I can deploy them with GitHub Actions using the Admin workflow roles that I’ve already deployed. (this might make you go cross-eyed for a moment … I’m using the OrgOps Admin GitHub Actions roles to deploy the Widget application GitHub Actions roles that themselves are saved in the aws-org-ops repo).
You can see the full workflow configuration here.
Mostly it looks pretty similar to the configuration for the Admin roles deployment - at least until the jobs section. E.g. the on trigger definitions are the same, just with a different path filter; and the concurrency and permissions sections are identical.
Fan out to each Account
Inside the jobs section is a section named strategy, and this is where the “fan out” technique I mentioned is implemented. It looks like this:
jobs:
  deploy:
    strategy:
      fail-fast: true
      matrix:
        accountID:
          - '024697548467' # Widget Dev
          - '820178564478' # Widget Prod
What this does is tell GitHub Actions that I want to run the deploy job several times using a matrix strategy - in this case once per accountID in the list. Remember each job run gets a completely separate host environment in GitHub Actions, and so this will configure AWS separately for each job’s run (more on that in a moment).
The fail-fast property is just there to abort (or never start) any job if one job fails.
Each run of the deploy job is identical except for the matrix variable accountID. I use accountID in precisely one place - when I configure the AWS environment:
  - uses: aws-actions/configure-aws-credentials@v4
	with:
	  role-to-assume: "arn:aws:iam::${{ matrix.accountID }}:role/GithubActionsOrgOpsAdmin"
	  aws-region: us-east-1
Instead of hard-coding the AWS Account ID, like I did in the previous example, I now use the accountID variable. Specifying the Account ARN like this is enough to target the correct AWS Account in each job run.
Run the deployment
Just like the previous example I prefer to use a deployment script rather than specify the precise AWS calls within the workflow configuration. In this case the workflow definition points to this script, which simply calls the AWS CloudFormation CLI. The one slight difference in the script is the use of the --capabilities CAPABILITY_NAMED_IAM since I’m deploying actual IAM roles in the top-level CloudFormation template, unlike with the earlier StackSet deployment.
This completes the work to deploy my application workflows - any time the role template or workflow definition changes then the roles will be created or updated in their target accounts.
Managing cross-account deployment of organization-managed resources
So far this has all been “a bit meta” - using GitHub Actions to deploy resources that themselves are used by GitHub Actions. So I’m going to finish up with one final example where I deploy a different type of Org Ops resource.
In Part 4 I showed a few examples with deploying CDK’s Bootstrap environment. I’m going to use the techniques I’ve already shown in this article to automate this.
CDK is Amazon’s higher level IaC tool that allows us to define CloudFormation stacks using languages like TypeScript, Python, and Java.
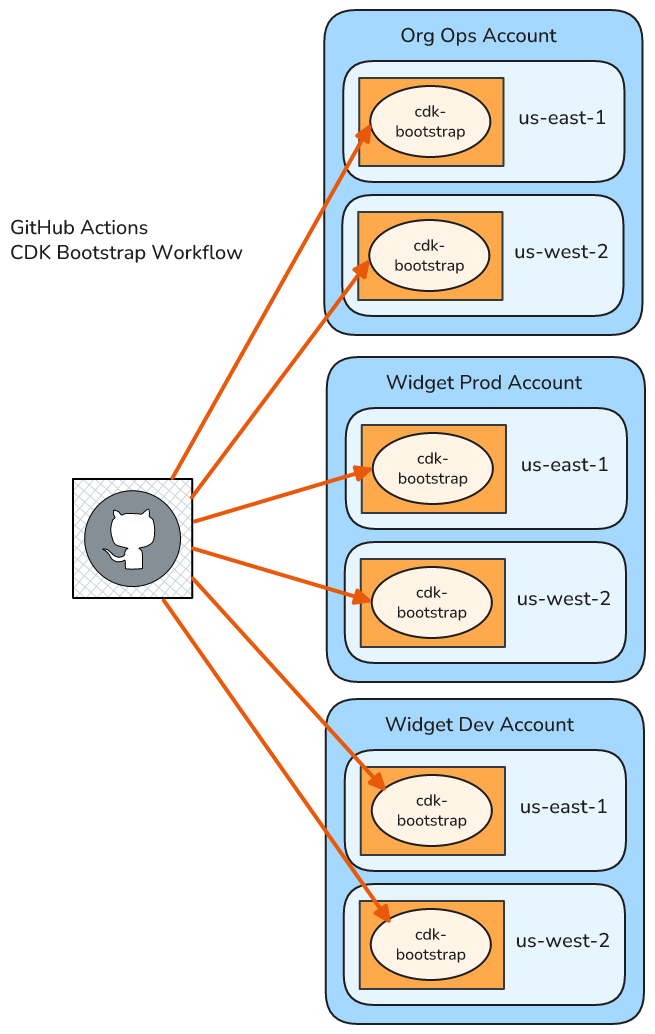
In this case I want to automatically deploy the same CDK Bootstrap:
- To all Accounts apart from the management Account
- To multiple regions for all Accounts - us-east-1 and us-west-2
The basic process is very similar to the previous section:
- Define the resources to be deployed in IaC
- Use a GitHub Actions workflow to automate deployment of the IaC definition to each Account + Region using a fan-out approach
Defining the CDK Bootstrap
There are a number of ways of creating the template of bootstrap resources for CDK. But by far the easiest is just to let CDK do it itself by running the CDK command line tool - npx cdk bootstrap . I can either do this whenever I want to deploy the Bootstrap to an environment, or I can store the bootstrap template in source control. My recommendation is the latter - that way I avoid having to run Node and install CDK in our bootstrap deployment, and further if I want to then I can manually look at the template and modify it as I see fit.
In the CDK Bootstrap directory of the example repository I have a script which generates the CDK Bootstrap template, and saves it to a specific file named generatedTemplate.yaml.
Deploying the Bootstrap
Yet again I use a GitHub Actions workflow to automate deploying the bootstrap. You can see the configuration here. It’s almost identical to the previous example for the application workflow roles, so I’m just going to point out the differences.
First, as expected, the paths filter in the on section is different, because I care about a different part of the repository.
This example also uses a matrix strategy, and I hard code the Account IDs to be targeted. The benefit is that this makes the configuration simple, and GitHub handles all the repetition for me. The drawback is that I have to manually specify all the Accounts I care about, and should I want to add an Account I’ll need to manually update this workflow configuration.
strategy:
  fail-fast: true
  matrix:
    accountID:
      - '353615902027' # Org Ops Account
      - '024697548467' # Widget Dev Account
      - '820178564478' # Widget Prod Account
    region:
      - 'us-east-1'
      - 'us-west-2'
In this case there are more accountID values than the previous example, because I want to also deploy to the Org Ops account.
As you scale up your organization you can automate the account ID specification process by calling this workflow from a parent workflow; in the parent workflow calculating the list of accountID’s by interrogating your AWS organization at run time; and passing those as a list when calling the main workflow.
I also specify a second matrix variable - region - and I specify the two regions I care about. Because I specify three Accounts and two regions then in total the job will run six times per workflow run - once for each combination of accountID and region.
By default GitHub Actions will try to run all variations of the job in parallel, but if you want to limit it you can do so by specifying the
max-parallelproperty.
The specification of the AWS Credentials is also slightly different:
- uses: aws-actions/configure-aws-credentials@v4
  with:
    role-to-assume: "arn:aws:iam::${{ matrix.accountID }}:role/GithubActionsOrgOpsAdmin"
    aws-region: ${{ matrix.region }}
In this case I’ve replaced the hard-coded us-east-1 region value with the equivalent matrix variable.
And finally I run a different deployment script - the one in the /cdkBootstrap, which in turn runs CloudFormation against our generated template:
aws cloudformation deploy \
  --template-file generatedTemplate.yaml \
  --stack-name cdk-bootstrap \
  --capabilities CAPABILITY_NAMED_IAM
And that’s it!
As you can see once you’ve built a couple of GitHub Actions workflows for deploying Organization resources then subsequent workflows will look very similar - especially if you delegate the process of calling your IaC tooling to a script.
Summary
This article showed you how to get GitHub Actions working with an AWS Organization. It also showed how you can automate the management of your Organization itself with GitHub Actions.
Specifically I covered:
- How you can bootstrap your OIDC configuration and admin workflows, and automate further updates to your Organization using a GitHub Actions workflow and CloudFormation StackSets.
- How you can provide AWS access for your application workflows
- How you can use GitHub Actions to implement a structured process for deploying various aspects of your AWS Organization.
Next Steps
This article wrapped up a three-part story on managing infrastructure through automation. Next time I’m going to switch gears and show you how you can set up fundamental monitoring for your AWS Organization.
Feedback + Questions
If you have any feedback or questions then feel free to email me at mike@symphonia.io, or contact me at @mikebroberts@hachyderm.io on Mastodon, or at @mikebroberts.com on BlueSky.